
WordPress Widgets add content and features to your Sidebars. Examples are the default widgets that come with WordPress; for Categories, Tag cloud, Search, etc. Plugins will often add their own widgets.
Widgets were originally designed to provide a simple and easy-to-use way of giving design and structure control of the WordPress Theme to the user, which is now available on properly “widgetized” WordPress Themes to include the header, footer, and elsewhere in the WordPress design and structure. Widgets require no code experience or expertise. They can be added, removed, and rearranged on the Theme Customizer or Appearance > Widgets in the WordPress Administration Screens.
Some WordPress Widgets offer customization and options such as forms to fill out, includes or excludes of data and information, optional images, and other customization features.
The Appearance Widgets Screen explains how to use the various Widgets that come delivered with WordPress.
Plugins that come bundled with widgets can be found in the WordPress Plugin Directory.
Installing Widgets
WordPress comes pre-packaged with a variety of Widgets. If those are insufficient for your needs you can install new ones by searching the WordPress Plugin Directory which is accessible from the WordPress Administration Plugins > Add New Screen.
Displaying Widgets
Existing Widgets in Existing Widget Areas
Before you can add a Widget you must verify that the Theme you’re using supports Widgets (more specifically: Widget Areas). You can do so by simply navigating to the Appearance menu and looking for a sub menu titled “Widgets”.
If your Theme supports Theme Customizer then you can use the following Steps. In Theme Customizer, the live preview of changes is available.
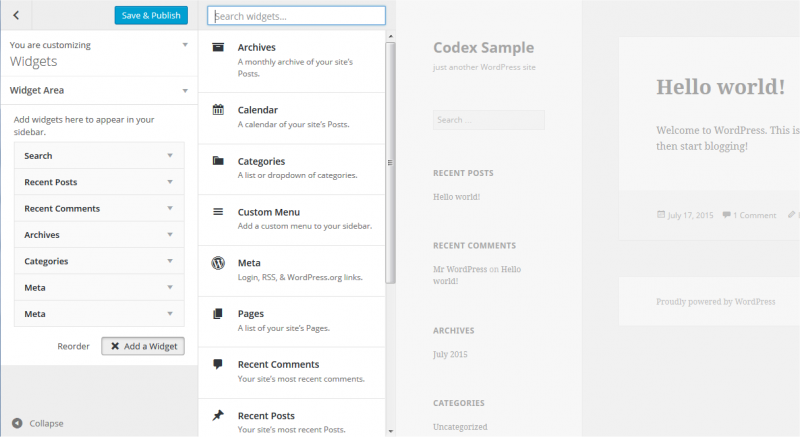
- Go to Appearance > Customize in the WordPress Administration Screens.
- Click the Widget menu in the Theme Customizer to access to the Widget Customize Screen.
- Click the down arrow of Widget Area to list the already registered Widgets.
- Click Add a Widget button at the bottom of sidebar. It shows the list of available widgets.
- Click a widget you want to add. The widgets should be added in the sidebar.
- Preview your site and you should see the content from your new Widget.
- To arrange the Widgets within the Sidebar, drag and drop the widgets in the order you want or click Reorder link and click up arrow and down allow of each widget and click Done after the arrange operation.
- To customize the Widget features, click the down arrow in the right to expand the Widget’s interface.
- To remove the widget, click Remove from Widget’s interface in above step.
If your Theme does not support Theme Customizer then you can use the following conventional steps:
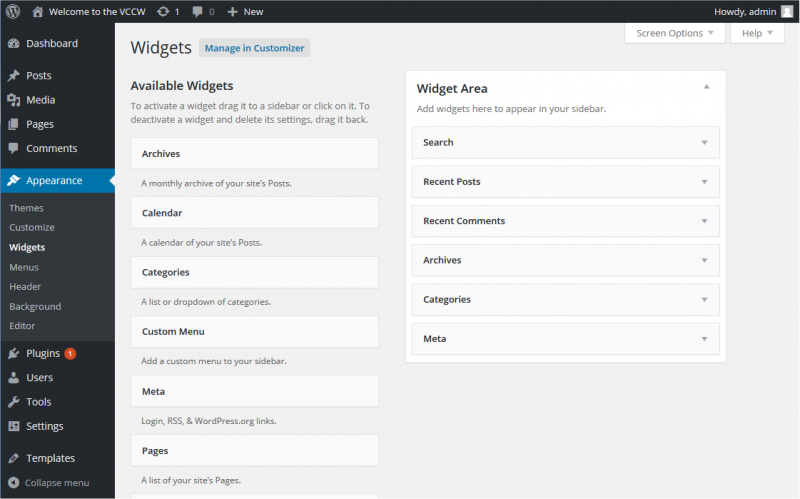
- Go to Appearance > Widgets in the WordPress Administration Screens.
- Choose a Widget and either drag it to the sidebar where you wish it to appear, or click the widget, (select a destination sidebar if your theme has more than one) and click the Add Widget button. There might be more than one sidebar option, so begin with the first one. Once in place, WordPress automatically updates the Theme.
- Preview the site. You should find that the “default” sidebar elements are now gone and only the new addition is visible.
- Return to the Widgets Screen to continue adding Widgets.
- To arrange the Widgets within the sidebar or Widget area, click and drag it into place.
- To customize the Widget features, click the down arrow in the upper right corner to expand the Widget’s interface.
- To save the Widget’s customization, click Save.
- To remove the Widget, click Delete.
If you want to remove the widget but save its setting for possible future use, just drag it into the Inactive Widgets area. You can add them back anytime from there. This is especially helpful when you switch to a theme with fewer or different widget areas.
When changing themes, there is often some variation in the number and setup of widget areas/sidebars and sometimes these conflicts make the transition a bit less smooth. If you changed themes and seem to be missing widgets, scroll down on the screen to the Inactive Widgets area, where all of your widgets and their settings will have been saved.
Enabling Accessibility Mode, via Screen Options, allows you to use Add and Edit buttons instead of using drag and drop.
Widget Areas
While widget areas typically occur in webpage sidebars, a theme can place widget areas anywhere on a page. For example, besides the usual sidebar locations, the other themes have widget areas in the footer or other areas of every page.
If you would like to place a Widget somewhere on your Theme that does not have a pre-defined Widget Area, you will need some programming knowledge and should follow the instructions on the Widgets API section of the official WordPress.org site.
Using Text Widgets
The Text Widget is one of the most commonly used WordPress Widgets that comes with every WordPress installation. It allows users to add text, video, images, custom lists, and more to their WordPress sites.
To use the WordPress Text Widget:
- Go to Appearance > Customize in the WordPress Administration Screens and click the Widget menu in the Theme Customizer. Or Go to Appearance > Widgets in the WordPress Administration Screens.
- Open the sidebar to which you wish to add the Text Widget.
- Find the Text Widget in the list of Widgets.
- Click and drag the Widget to the spot you wish it to appear.
To open and edit the Text Widget:
- Click the down arrow to the right of the Text Widget title.
- Set the Text Widget Title (optional).
- Add the text or HTML code to the box or edit what is currently there.
- Choose the option to Automatically add paragraphs to wrap each block of text in an HTML paragraph tag (recommended for text).
- Click Save to save the Text Widget.
- Click Close to close the Text Widget.
- Switch tabs in your browser and preview the results and make changes if necessary.
The Text Widget can hold a variety of HTML, XHTML, and multimedia links and players such as video and object embeds.